How to create Contacts (SUPPLIER & CUSTOMERS) #
I will show you how to create contacts for suppliers and customers in KeepMyAccount, a simple and easy-to-use accounting software. You can follow the same steps for both types of contacts, as the process is very similar. Here is a screenshot of the contacts page, where you can see the options to add new contacts, edit existing ones, or delete them.
Goto Contacts -> Suppliers or Customer
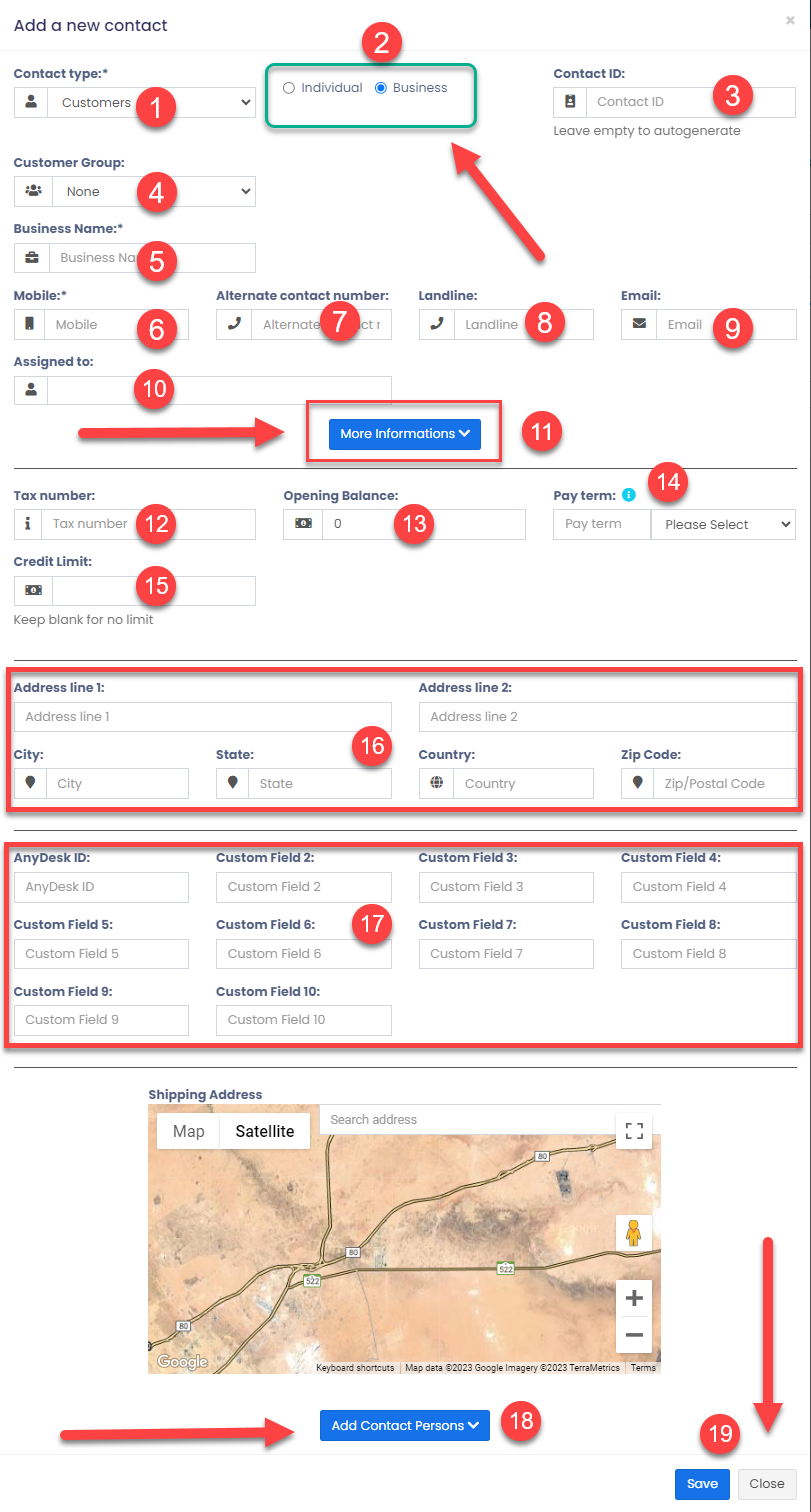
To add a new contact, click on the Add New Contact button on the top right corner. A pop-up window will appear, where you can enter the details of the contact. Let’s go through each field one by one.
1 – Contact Type: Here you can choose whether the contact is a supplier, a customer, or both. This will determine how the contact is treated in the system, such as how invoices and payments are handled.
2 – Contact Name: Here you can choose whether the contact is an individual or a company. If you choose individual, you will have to enter the first name and last name of the person. If you choose company, you will have to enter the company name.
3 – Contact ID: This is an optional field, where you can assign a unique identifier to the contact. This can be useful for tracking and reporting purposes. You can enter any number or text that you want, or leave it blank if you don’t need it.
4 – Customer Group: Here you can assign the contact to a customer group, which is a way of categorizing your customers based on some criteria. For example, you can create customer groups based on location, industry, size, etc. To learn more about customer groups and how to create them, check out this docs page.
5 – Company Name: This field will only appear if you choose company as the contact name. Here you can enter the name of the company that the contact represents.
6 – Mobile Number: Here you can enter the mobile number of the contact person. This is a mandatory field, as it is used for sending SMS notifications and reminders.
7 – Alternate Number: Here you can enter another phone number of the contact person, in case the mobile number is not reachable or available.
8 – Landline Number: Here you can enter the landline number of the contact person or the company, if they have one.
9 – Email Address: Here you can enter the email address of the contact person or the company. This is also a mandatory field, as it is used for sending email notifications and invoices.
10 – Assign To: Here you can assign the contact to one of your users, who will be responsible for managing and communicating with them. You can choose from a list of users who have access to your account.
11 – More Information: If you click on this button, you will see more fields that are optional but useful for adding more details about the contact.
12 – Tax Number: Here you can enter the tax number of the contact person or the company, if they have one. This is used for tax calculation and reporting purposes.
13 – Opening Balance: Here you can enter the opening balance of the contact before you start using KeepMyAccount. This is the amount that they owe you or that you owe them from previous transactions. This will be added to or subtracted from their account balance in the system. More information check this docs.
14 – Pay Terms: Here you can specify the payment terms for the contact, which are used to calculate their due date and send payment reminders. You can choose either days or months as the unit, and enter a number as the value. For example, if you enter 30 days, it means that the contact has 30 days to pay after receiving an invoice from you.
15 – Advance Balance: Here you can enter the advance balance of the contact, which is the amount that they have paid or received in advance for future transactions. This will be deducted from or added to their account balance in the system. More information check this docs.
16 – Credit Limit: Here you can enter the credit limit of the contact, which is the maximum amount that they can owe you at any given time. If they try to buy something from you on credit and their account balance exceeds this limit, they will not be allowed to do so until they pay some of their outstanding amount. More information check this docs.
Once you have entered all the details, click on Save Contact to create the contact in KeepMyAccount. You will see a confirmation message and a summary of their information on your screen. You can also edit or delete them from here if needed.
That’s it! You have successfully created a contact for supplier or customer in KeepMyAccount. You can now use them for creating invoices, recording payments, sending reminders, generating reports, and more.
Viewing Suppliers & Customers #
- To view details about a Supplier or Customer click on the View button. It will show the complete details along with the relevant transactions (Purchases & Sales) for that contact.
- Pay the Due amount: You can use this button to pay the due amount for a customer or supplier. This will pay the overall due amount for all invoices.


